
Projects keep NAHPU data organized. A project can contain personnel, taxa, sites, collecting events, specimen records, narratives, and linked media.
Creating a project
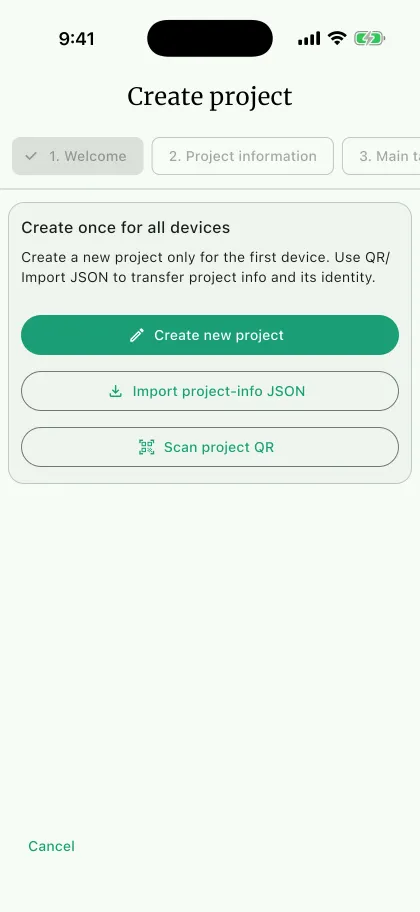
Section titled “Creating a project”From the home screen, select Create project, and then choose whether to create a new identity or reuse project information from another device.
- On
Welcome, selectCreate new projectG. To reuse an existing project identity instead, selectImport project-info JSONH or, on mobile,Scan project QR. - Under
Project information, enter a unique project name between 3 and 25 characters. Optionally add a description, principal investigator, institutional accession, location, IANA time zone, and start and end dates. - Under
Main taxon, choose the taxon that should control new specimen forms on this device. A project can contain multiple taxon groups. This step can be skipped and changed later inSettings>Format. - Under
Field ID, choosePersonnelorProject. This step can also be skipped and completed later inSettings>Specimens.Personneluses an eligible Cataloger's initials and personal field number. Select an existing Cataloger or create one when the conditionalCatalogerstep appears.Projectcombines a prefix, current catalog number, and suffix. NAHPU inserts no separators. Turn on auto-increment to advance the project number when it is assigned.
- On
Review, check the project identity, device setup, and taxonomy readiness. SelectCreate projectto open the dashboard.
NAHPU generates a UUID for a new project. On wide screens, the wizard displays its steps in a left rail; on narrower screens, the same steps appear as horizontal chips. The workflow and validation are the same in both layouts.
Importing project-info JSON or scanning its QR preserves the source UUID and goes directly to review. It copies project metadata only—not records, personnel, taxa, media, or device settings. Use a full project transfer when those data must also move between devices.
Project time zone
Section titled “Project time zone”The Time zone field records the IANA time-zone location where the project is being conducted, such as Asia/Jakarta or America/New_York. Select the location that best represents the fieldwork rather than the time zone of a device used to enter data.
NAHPU stores the selected time zone as project metadata. It is shown in the Project Overview, included when project information or a full project transfer is exchanged, and available as the project::timeZone value in document templates and exports. It provides context for interpreting dates and times when data is reviewed on another device or shared with collaborators.
The time zone does not change the device clock or automatically convert existing narrative, event, or specimen times. Those times remain the local clock values entered in their records, so record the fieldwork time using the project's selected time zone and keep that setting consistent across devices.
Viewing dates and times on another device
Section titled “Viewing dates and times on another device”NAHPU stores record dates and times as plain values rather than as timezone-aware instants. When the same project is opened on another device, NAHPU does not shift a recorded time based on that device's time zone. The device may format the same value differently according to its locale—for example, changing the date order, month name, or 12-/24-hour clock—but the entered wall-clock value remains unchanged.
For example, if the project time zone is Asia/Jakarta and a field event is entered as 12 May, 08:30, another device may display the date and time in a different local format, but it will not convert the value to a different clock time. This is important because time zone conversion is irrelevant for specimen collection, and would mean something different for organism activities. Asia/Jakarta identifies the context in which 08:30 should be understood.
Why the project time zone matters
Section titled “Why the project time zone matters”Keeping the project time zone accurate helps collaborators compare field events entered on different devices, preserves temporal context when project data is shared or transferred, and supports reproducible interpretation of exported records. A third-party database that stores temporal context in UTC can use the time zone to interpret the data correctly. If a team works across time zones or enters historical data from another location, explain the exception in a project description or other appropriate record context, such as in a narrative. When appropriate, we recommend creating a separate project for a location in a different time zone.
Managing projects from the home screen
Section titled “Managing projects from the home screen”Each project has an action menu with these options:
- Edit info - Update the project form.
- Show QR - Display project information for a mobile device to scan.
- Export info - Export project information as JSON. This contains project details, not the project's records and media.
- Details - View project information without editing it.
Project dashboard
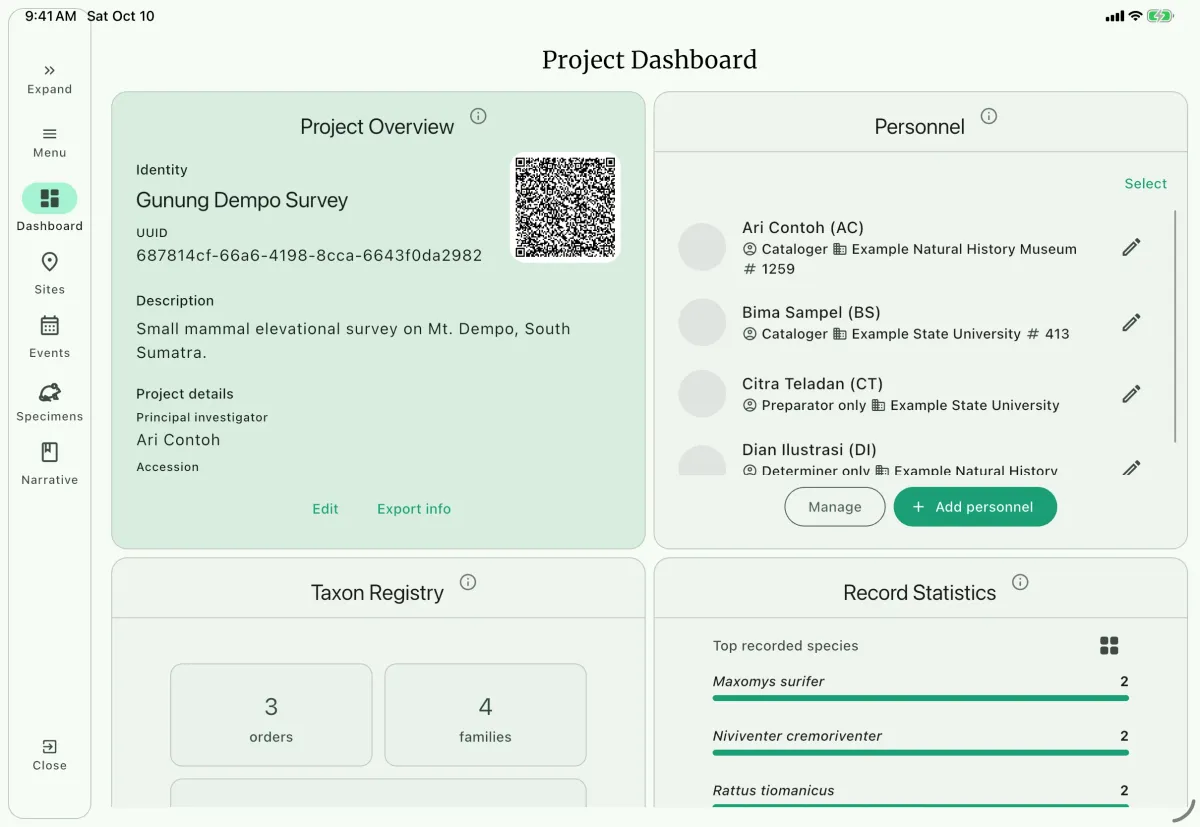
Section titled “Project dashboard”The dashboard contains four panels:
- Project Overview A - Shows the project name, UUID, description, principal investigator, accession, location, time zone, dates, creation date, and last access. Information is grouped as Identity, Description, Project details, Schedule, and Record metadata. Use
EditB to change the project andExport infoto share C its information. - Personnel D - Lists personnel assigned to the project. Use
Add personnelto select an existing database entry or create a new one. - Taxon Registry E - Lists registered taxa and provides controls to add or import taxa.
- Record Statistics F - Summarizes records in the project and provides access to more detailed statistics.
The project menu also contains project transfer, export, backup, settings, and project deletion actions.
Updating project information
Section titled “Updating project information”From the dashboard, select Edit in the Project Overview panel. From the home screen, open a project's action menu and select Edit info. The edit form groups fields under Project details, Place and time, and Project dates. Change the main taxon or field-ID defaults in Settings.
Sharing project information
Section titled “Sharing project information”Project information can be copied to another device without transferring records:
- On the source device, choose
Export infoorShow QRfrom the project's home-screen action menu. - On the receiving device, choose
Create project, then useImport project-info JSONorScan project QRI on mobile.
These methods retain the source project's UUID and create a project with the same project information. To transfer records, media, and related data, use the Transfer a Project workflow instead.
Transferring project data
Section titled “Transferring project data”Use Export project to create a transfer. On the receiving installation, home-screen Import project creates a local project; Merge project combines data with a project that already exists. Importing project-info JSON or a project QR code creates only the project identity, without records or media.
ZIP and TAR.GZ project exports include available media. Light JSON.GZ includes records only. Review missing-file warnings and keep the source until records and attachments on the receiving device are verified.
A compatible NAHPU Data Package can also be imported or merged because it includes the project payload. Darwin Core packages and tabular exports cannot restore a NAHPU project. Database replacement is a separate installation-level recovery operation.
Deleting a project
Section titled “Deleting a project”Open the project menu and choose Delete project. NAHPU asks you to enter the first five characters of the project's UUID because deletion cannot be undone.
Deleting a project removes its specimen records and measurements, collecting events and efforts, event personnel, narratives, sites and coordinates, project-personnel links, project media, and the project record. Stored project files are also removed. Media still shared with a taxonomy record is detached rather than deleted. If file cleanup fails, NAHPU reports a warning after the database records have been deleted.
Export a project transfer or database backup before deleting if you may need the data later.
Terminology
Section titled “Terminology”Principal Investigator
Section titled “Principal Investigator”The principal investigator is the person responsible for the project.