
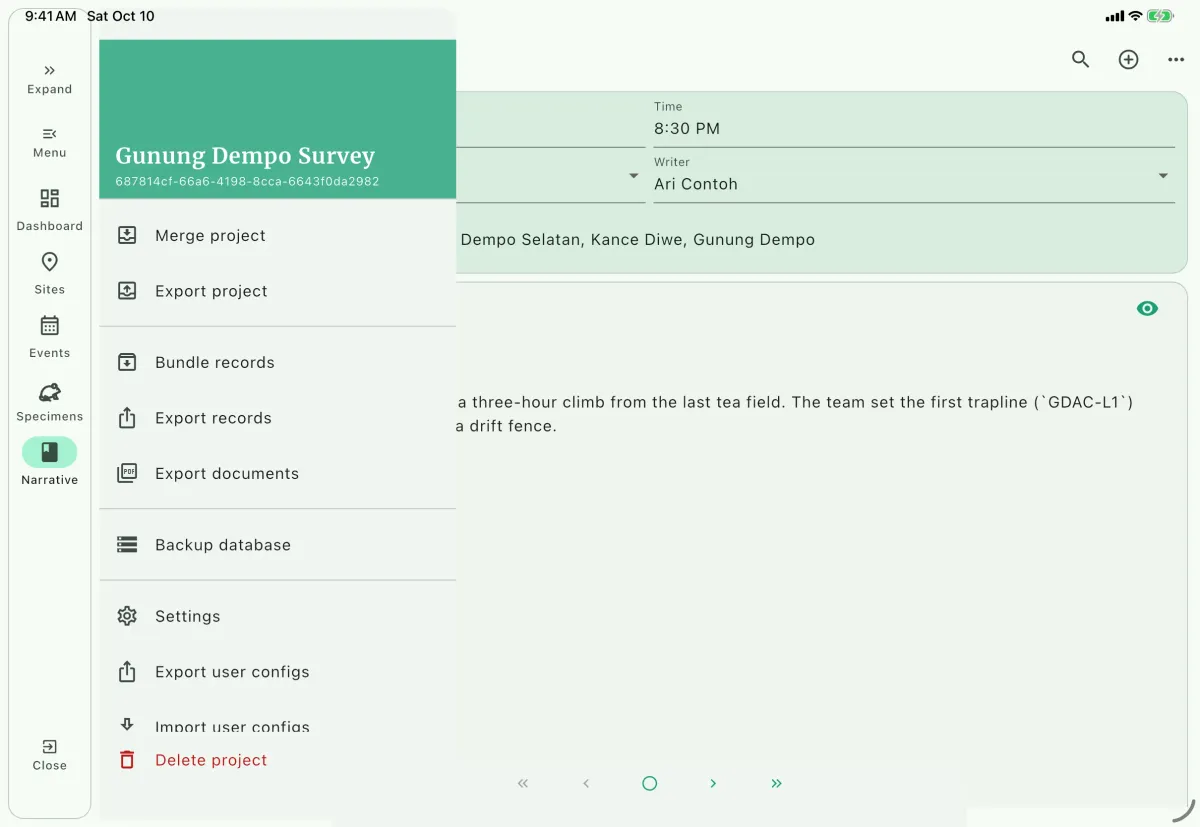
Use Export project B to create a transfer. On the receiving installation, home-screen Import project creates a local project; Merge project A combines data with a project that already exists. Importing project-info JSON or a project QR code creates only the project identity, without records or media.
ZIP and TAR.GZ project exports include available media. Light JSON.GZ includes records only. Review missing-file warnings and keep the source until records and attachments on the receiving device are verified.
A compatible NAHPU Data Package can also be imported or merged because it includes the project payload. Darwin Core packages and tabular exports cannot restore a NAHPU project. Database replacement is a separate installation-level recovery operation.
Choose an output
Section titled “Choose an output”Backup strategy
Section titled “Backup strategy ”Keep a verified copy of each field day’s project data away from the working device.
- Open the project drawer and select
Export project. - Review record counts and missing-file warnings. Choose ZIP or TAR.GZ to include available media. Light JSON.GZ contains records only and is not a complete media backup.
- Save the export with the project name and date, and copy it to separate storage or another device.
- Check that the copy is accessible and review warnings before treating the backup as complete. Periodically test recovery on another installation.
- Use
Import projecton the home screen to recover onto a receiving installation, orMerge projectwithin an existing project. - Create a full
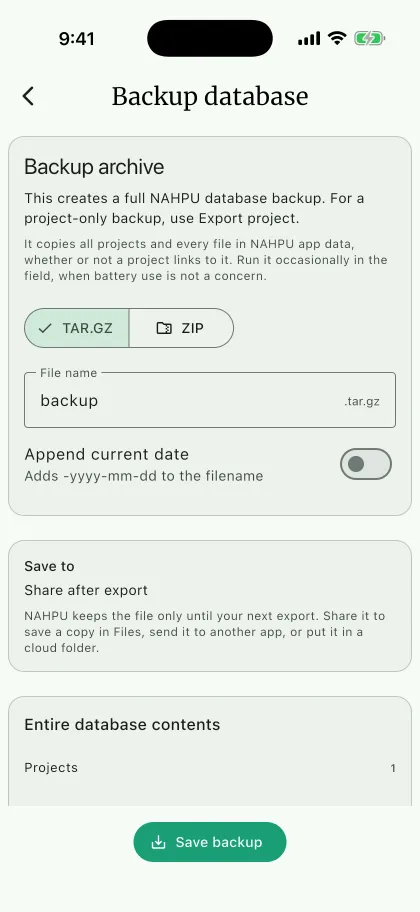
Backup databaseF at a regular checkpoint, such as weekly, and before importing, merging, or replacing data. Retain the previous verified backup until the new one is checked.
Backup database
Section titled “Backup database ”Backup database creates ZIP or TAR.GZ H containing the SQLite database and the managed project, personnel, and user-configuration directories, including files not linked to current project records. A standalone SQLite file contains database records but does not supply media or other managed files.
Open the project menu, select Backup database, choose the format, file name, and destination, then select Save backup I. Keep a copy outside the working device and verify it before replacing a previous backup.
Export user configs
Section titled “Export user configs”Export user configs G writes selected reproducibility-related user configs, including saved export and document presets, to a settings file.
- Navigate to the
Dashboardpage. - Open the project menu and select
Export user configs. - Select the
Settings format.JSON (.json)JSON.GZ (.json.gz)
- Add
File name. - Select the
Directorywhere you want to save the file. - Click
Export user configs.
Restoring a database
Section titled “Restoring a database”Use database restore when you need to replace the current NAHPU database with a backup file.
- Open
Settings. - Under
Database, selectReplace database. - Under
Replace with, selectBrowseto choose a.sqlite3database file, ZIP archive, or TAR.GZ archive. - Review the comparison. After you choose a file, NAHPU reads it and shows its schema version, records, files, and size next to the current database. An older schema is upgraded after the restore. A file that is not a NAHPU database, or that was made by a newer NAHPU version, cannot be restored; update NAHPU first to restore a newer backup.
- Keep
Back up current data firstenabled unless you are certain you do not need the current data. The backup is saved as a TAR.GZ archive in the NAHPU backup folder. - Select
Replace database. - Confirm the warning.
Restoring a database replaces the current project database. If you restore an archive, NAHPU extracts it, copies included project files into the app documents directory, imports any included user configs, and then replaces the active SQLite database. Personnel photos from older backups, which kept them in the project folder, are restored to the app's personnel photo folder.
A restore overwrites any media or config file whose name matches one in the archive, in place and without a second copy; a file that is already identical is left untouched. Files that exist only on the device are not deleted, so they remain and will appear in later backups. None of this can be undone afterwards, which is why Back up current data first should stay enabled.
Restoring user configs
Section titled “Restoring user configs”Use settings restore when you want to replace the current user configs with configs from another device or backup.
- Open the project
Dashboardmenu. - Select
Import user configs. - Choose a
.jsonor.json.gzsettings file. - Click
Replace. - Confirm the warning.
Restoring user configs updates the app's configuration store. It does not replace the project SQLite database by itself. To restore both project data and user configs together, restore a ZIP or TAR.GZ database archive.
For the contributor-level storage and compatibility model, see Data import and export.
Archiving a project
Section titled “Archiving a project”Archiving preserves a reviewed project and the exports needed to understand, restore, and use it later. Archive the project export together with enough context to identify its contents, date, software, and responsible institution.
Before archiving:
- Complete data curation and resolve or document known issues. See Data Management.
- Create a fresh database backup.
- Export user configs when controlled values, export presets, templates, or document layouts are needed to reproduce the workflow.
- Choose the export format that matches the future use. Use a full ZIP or TAR.GZ project export when the archive must include available media.
- Export structured records or a data package when they are needed for analysis, publication, or independent reuse.
Use Export project with Light export off to create a complete project copy. Review record counts and missing-media warnings before saving. Use a descriptive name that includes the project, export type, and date, such as BorneoMammals_project_20241015.tar.gz.
Keep the project export, database backup, settings export, and a short readme together when they serve different recovery or reproducibility purposes. Store at least two copies in separate locations and retain the original until the archive has been checked on another device.
Record the archive date, contents, storage locations, and access restrictions. Periodically open an export or restore it to a test device to confirm that the files remain readable and the project is usable. Preserve the digital exports and printed documents according to institutional retention and conservation policies.
Before sharing data
Section titled “Before sharing data”Before sending NAHPU data to a museum, collaborator, or another device:
- Create a fresh database backup.
- Use a light
JSON.GZproject export only when the recipient needs records and not media, especially over limited internet. - Create a ZIP or TAR.GZ project archive when media or a complete project copy needs to move with the project.
- Export user configs if the recipient needs the same controlled lists, export presets, templates, or document layouts.
- Export record files or documents needed by the recipient.
- Verify at least one restore path before deleting data from the original device.