
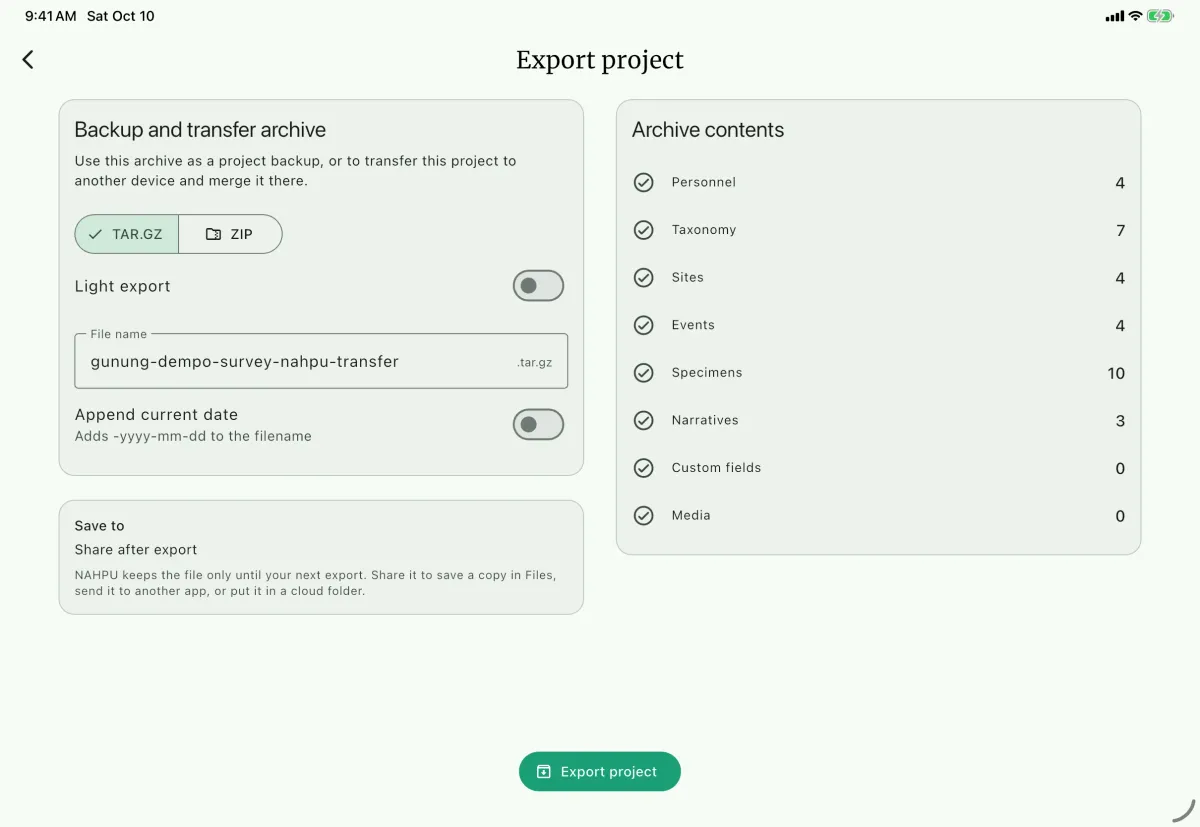
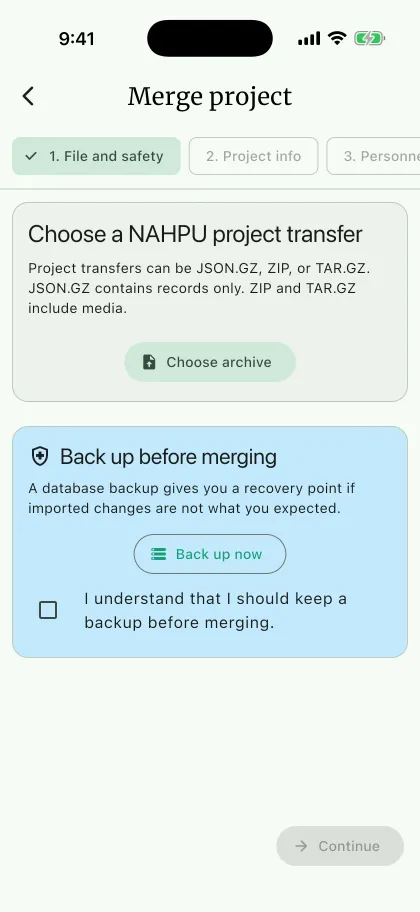
Use Export project to create a transfer. On the receiving installation, home-screen Import project creates a local project; Merge project combines data with a project that already exists. Importing project-info JSON or a project QR code creates only the project identity, without records or media.
ZIP and TAR.GZ project exports include available media. Light JSON.GZ includes records only. Review missing-file warnings and keep the source until records and attachments on the receiving device are verified.
A compatible NAHPU Data Package can also be imported or merged because it includes the project payload. Darwin Core packages and tabular exports cannot restore a NAHPU project. Database replacement is a separate installation-level recovery operation.
Export a project
Section titled “Export a project”- Open the project on the source device.
- Open the dashboard menu and select
Export project. - Review the counts for personnel C, taxonomy, sites, events, specimens, narratives, and media. Review warnings for missing media.
- For a full project transfer or backup, leave
Light exportoff and selectZIPorTAR.GZA. For a limited-internet upload, turn onLight exportB to useJSON.GZwithout media. - Select
Export projectD, then store or share the archive securely.
Only taxonomy referenced by specimens in the active project is exported. Project personnel photos, project media, and linked taxonomy media are included when their source files are available. Missing files are reported as warnings and their broken links are omitted.
Specimen transfer includes the taxon-specific attribute row. For invertebrates, that means ecological interactions, environmental parameters, optional morphometrics, sex, and remarks. Replacing an imported invertebrate specimen also replaces its invertebrate attributes; parasite records are not created for it.
Merge into the matching project
Section titled “Merge into the matching project”- Open the receiving copy of the project.
- Open the dashboard menu and select
Merge project. - Choose a
JSON.GZE, ZIP, or TAR.GZ project export, or a NAHPU Data Package. - Confirm the backup reminder G.
- Review project info, personnel, taxonomy, sites, events, specimens, and narratives one section at a time.
- Resolve each match or conflict.
- Review the final summary and select
Merge project.
NAHPU checks the export and its relationships before showing the review. No records are written while you move through the wizard. At the final step, database changes are committed together. If the merge fails, database changes are rolled back and newly copied media files are removed.
Resolve conflicts
Section titled “Resolve conflicts”NAHPU initially keeps the current record when it finds a conflict. You can choose:
- Keep current - Preserve the current record and map imported dependencies to it.
- Use imported - Replace the matched record and its imported owned data.
- Import as new - Create a separate record and remap its dependencies. A new UUID is generated when required, and duplicate site IDs receive a unique imported suffix.
- Skip - Do not import the record. Dependent records that cannot be remapped are also skipped.
Project information is reviewed field by field. Personnel UUIDs and specimen UUIDs are used for identity; taxonomy is matched by normalized genus and specific epithet. Sites use a nonempty site ID. Events match by resolved site, start date, and ID suffix; start time is not part of this match. Narratives match by resolved site, date, time, and writer.
Personnel and taxonomy are shared across projects in the database. The wizard warns when replacing one could affect another project. A specimen UUID already used by a different project cannot be replaced; import it with a new UUID or skip it.
Force merge a different project UUID
Section titled “Force merge a different project UUID”The normal workflow requires the export project UUID to match the active project UUID. A mismatch is blocked because it usually means the wrong project is open.
If the projects truly represent the same field project, enable Force merge and type the active project name to confirm. NAHPU then assigns the active project UUID to imported project-scoped records. Force merge does not automatically overwrite conflicts; all normal conflict choices still apply.
Import onto another installation
Section titled “Import onto another installation ”Create a local project from a NAHPU transfer or recover a project on a replacement device.
- Keep the source archive and back up any existing data on the receiving installation.
- On the home screen, select
Import project, thenChoose archive. Select a project JSON.GZ, ZIP, TAR.GZ, or compatible NAHPU Data Package. - Review the project identity and
Destination project name. If the project UUID already exists, useOpen Merge project; a different project with the same name needs a distinct destination name. - Acknowledge the backup reminder, review personnel, taxonomy, and specimens, and resolve every item marked
Needs attention. - Review counts and missing-file warnings, then select
Import projectat the final review. - Open the imported project and check sites, events, specimen identifiers, narratives, and several attachments. JSON.GZ does not contain media; retain the source until verification is complete.