
Setting up specimen records
Section titled “Setting up specimen records”The NAHPU default lists for Specimen parts and Treatments are intentionally short. Before entering a large batch of specimens, configure the project lists that your team will use in the field or collection room.
Navigate to the dashboard.
Tap/click the hamburger menu in the top left corner.
Select
Settings.Select
Specimens.Configure the
Use project IDtoggle. It is off by default, which uses a cataloger's initials and field number. At least one Cataloger must have personal field-number registration enabled and a current number.Turn on
Use project IDto configure a prefix, the next catalog number, and a suffix. NAHPU concatenates those values directly. Turn on auto-increment to assign and advance the project number when a new specimen uses this mode.This choice is only the default. Open a specimen's field-ID editor to choose Personnel or Project for that specimen. A project can contain both types, but one specimen cannot have both identifiers.
Add
Tissue ID(optional).Some museums assign separate tissue numbers for the same voucher specimen. You can set up a prefix and the next number here. NAHPU can then generate the next tissue number when you add a specimen part.
Add
Specimen types.Add all preparation and tissue types you expect to use, including types you may only collect occasionally.
Add
Treatments.Treatments are used on specimen parts. Examples include
None,ETOH,Formalin,LN2, andDMSO.
Adding a new specimen record
Section titled “Adding a new specimen record”Navigate to the specimen page using the bottom navigation bar.
Click the
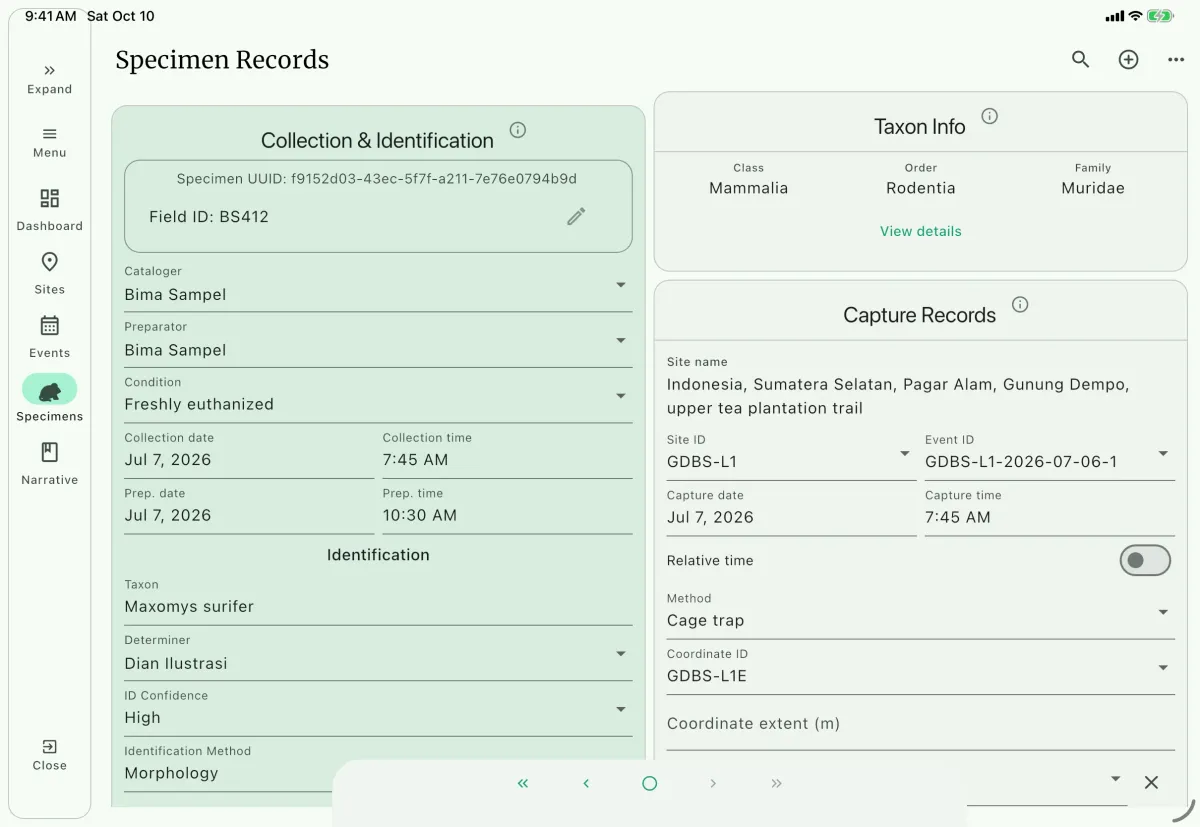
+button A to add a new specimen record.You can also use the three-dot menu and choose a duplicate action when you want to reuse part of the current specimen record.
Select
CatalogerB.This is the person responsible for cataloging the specimen. Depending on the project field ID mode, NAHPU can use the cataloger's field number or a project-level field number.
Select
Preparator.NAHPU defaults the preparator to the cataloger. If a different person prepares the voucher or part, update the preparator field.
Select the
TaxonD.Start typing to search the project's taxon registry, then select the matching record from the list. NAHPU populates the
Taxon InfoE panel from that taxon record. Because the registry holds records at any rank, material that is not yet identified to species can be linked to its family or genus and refined later.Select
ID Confidence.This tells later reviewers how confident you are in the identification and helps curators prioritize records that need review. The values are
Low,Medium, andHigh.Select the specimen
ConditionC.The default values are
Freshly euthanized,Good,Fair,Poor,Rotten,Released, andUnknown. Conditions are a controlled vocabulary: edit the list inSettings>Specimens>Conditions.Add the
Collection date,Collection time,Prep. date, andPrep. timewhen available.
Collection and Identification
Section titled “Collection and Identification”The Collection & Identification card stores the core specimen metadata:
Museum ID: optional museum catalog or accession identifier.- Field ID: either the cataloger's field number or a formatted project number. Use the responsive field-ID editor to select the type for this specimen. Switching types removes the previous identifier; consumed numbers are not reused.
Cataloger: the person who catalogs the specimen.Preparator: the person who prepares the specimen or voucher.Determiner: the person who identified the specimen.Taxon: the selected record from the project taxon registry.ID Confidence: confidence in the identification.Identification Method: optional method or evidence used for identification.Condition: condition of the specimen.Collection dateandCollection time: when the specimen was collected.Prep. dateandPrep. time: when the specimen was prepared.
Taxonomy
Section titled “Taxonomy”The Taxon Info card is read from the taxon selected in Collection & Identification. It shows class, order, and family in the specimen form. Select View details to review the full taxonomy record, including:
- the record's
Rank; - kingdom and phylum, taken from the registry when recorded and inferred from class otherwise;
- class, order, family, genus, and — when the record reaches those ranks — species and subspecies, plus authors and common name;
- Red List category, CITES status, country status, and notes when present.
Capture Records
Section titled “Capture Records”Capture records connect a specimen to the collecting event, site, coordinate, method, and collector that produced it.
Site ID: the site associated with a collecting event.Event ID: the collecting event for the specimen. Changing the event clears event-dependent fields in this card except capture date and capture time.Capture dateF: the date the specimen was captured.Capture time: exact time, or a relative time whenRelative timeis enabled.Relative time: switches capture time to one ofDawn,Morning,Afternoon,Dusk, orNight.Method: the collecting effort/method from the selected event.Method ID: an optional trap, net, or other method-specific identifier.Coordinate ID: the coordinate record associated with the selected event.Coordinate extent (m): optional positive distance describing how far the capture record extends beyond the coordinate point. It appears immediately belowCoordinate ID.Collector: optional collector from the selected event personnel list.
In Darwin Core exports, a positive coordinate extent is added to the saved coordinate uncertainty. If the coordinate has no valid uncertainty, the extent is used by itself. Empty, zero, and negative values are ignored.
Measurements
Section titled “Measurements”The catalog format selected in Settings decides which measurement form a specimen shows: Mammalogy shows the mammal form, Ornithology the bird form, Herpetology the herpetofauna form, and Invertebrate zoology the invertebrate form. Select the tab below to view measurement options for each taxonomic group.
Mammal, bird, and herpetofauna weight fields support g, kg, and lbs and default to g. Changing the unit only changes the label; it does not convert the entered number.
Sex is a restricted controlled vocabulary shared by every taxon group. Male, Female, and Unknown are always available. In Settings > Specimens, add Gynandromorph, Hermaphrodite, Female?, or Male? to the dropdown. The question mark records that the examiner is uncertain.
Life stage is also shared by every taxon group, and replaced the older numeric age fields. It is an editable controlled vocabulary: the defaults are Egg, Larva, Nymph, Pupa, Neonate, Juvenile, Subadult, Adult, Metamorph, and Unknown, and the list is configured in Settings > Specimens > Life stages.
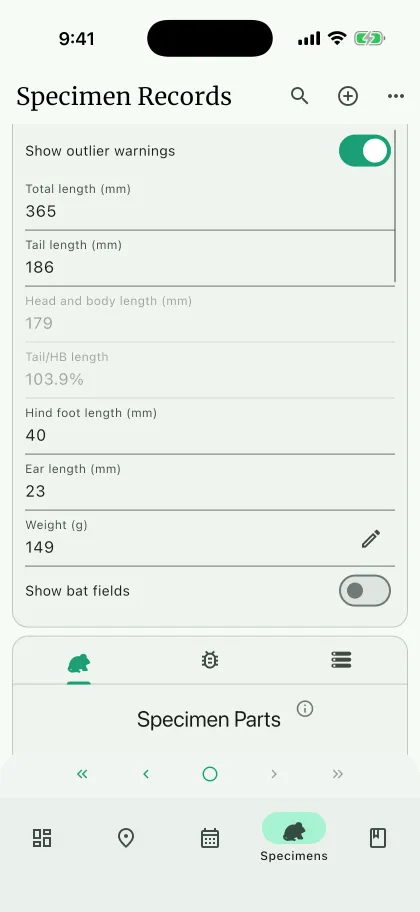
Total length (mm)G: the total length from the tip of the nose to the tip of the tail.Tail length (mm): the length of the tail from the base to the tip.Head and body length (mm): auto-calculated fromTotal length (mm) - Tail length (mm).Tail/HB length: auto-calculated fromTail length (mm) / Head and body length (mm).Hind foot length (mm): the length of the hind foot from the base to the tip of the claw.Ear length (mm): ear length.Weight: specimen weight in the selected unit.Accuracy: measurement accuracy or reason measurements may be inaccurate.Sex: select from the configured specimen-sex vocabulary.Life stage: select from the configured life-stage vocabulary.- Male reproductive fields: testis position, testis length and width, and epididymis appearance.
- Female reproductive fields: vagina opening, pubic symphysis, reproductive stage, mammae condition, mammae counts, placental scar counts, embryo counts, and embryo crown-rump length.
- Bat fields, when enabled H: forearm length, tibia length, echolocation type, maximum and minimum frequency, frequency at maximum energy, and duration.
Remarks: additional notes about measurements.
Weight: specimen weight in the selected unit.Wingspan (mm): wingspan length.- Soft-part colors:
Bill color,Maxilla color,Mandible color,Iris color,Tarsus color, andToe color. Sex: select from the configured specimen-sex vocabulary.Life stage: select from the configured life-stage vocabulary.Brood patch: whether a brood patch is present.Bursa present: whether a bursa is present. If present, record bursa length and width.Skull ossification (%): selected from the available percentage list.Fat: fat category fromNonethroughExtremely Heavy.Stomach contents: notes on stomach contents.- Male gonad fields: testis length, width, and remarks.
- Female gonad fields: ovary length, ovary width, ovary appearance, ova sizes, oviduct width, oviduct appearance, and remarks.
- Molt fields: wing molt, tail molt, body molt, and molt remarks.
- Notes: habitat remarks and specimen remarks.
Sex: select from the configured specimen-sex vocabulary.Life stage: select from the configured life-stage vocabulary.Weight: specimen weight in the selected unit.SVL (cm): snout-vent length.Remarks: additional information about the specimen.
The ecological-interaction section is visible by default. Use Show specimen morphometrics to reveal or hide the measurement fields; saved morphometric values automatically reopen that section.
Sex: select from the configured specimen-sex vocabulary.Life stage: select from the configured life-stage vocabulary.Caste: the caste of a social insect, when applicable.- Ecological interactions:
Host organismandHost part. - Optional morphometrics:
Head width (mm),Body length (mm),Upper wingspan (mm), andLower wingspan (mm). Remarks: additional ecological or specimen notes.
Environmental conditions are not specimen attributes. Record canopy cover on the site under Site Attributes, and temperature, humidity, pH, dissolved oxygen, and flow velocity on the collecting event's environmental data.
Invertebrate catalogs do not show parasite-detection fields or the parasite tab.
Measurement fields depend on the catalog format and the tabs available in your project. Record the fields shown for the selected format.
Specimen Parts
Section titled “Specimen Parts”Use Specimen Parts I for voucher preparations, tissues, swabs, parasites, and other physical parts derived from the specimen. Each specimen can have multiple parts.
The parasite tab is available for mammals, birds, and herpetofauna. It is not available for invertebrate catalogs.
Part fields include:
Tissue ID: optional tissue identifier. NAHPU can repeat or generate the next configured tissue number.QR/barcode ID: optional unique ID for a tube, tag, or container. On mobile, NAHPU can scan a QR/barcode; it can also generate a UUID.Preparation type: user-defined specimen part type.Counts: number of parts or containers.Treatment: preservation treatment.Additional treatment: optional second treatment.Storage type: storage medium or method.Storage location: freezer, cabinet, shelf, or container location.Time taken: time the part was taken, recommended for fresh tissues.Preparator: part-level preparator when different from the voucher preparator.Date taken: date the part was taken.PMI: post-mortem interval, for example1:30.Museum permanent: museum that permanently holds the part.Museum loan: museum receiving the part on loan.Remarks: notes specific to the part.
The part list displays the part type, count, barcode ID, preparator, tissue ID, treatment, date/time, PMI, and whether a remark exists.
Parasite curation records carry their own Storage and Storage location fields so the preservation method and physical location can be recorded separately.
Associated Data
Section titled “Associated Data”Use Associated Data for specimen-linked digital data that is not better stored as a specimen part or media record. Examples include GenBank accessions, MorphoSource records, analysis files, or external database links.
Associated data fields include:
Data type:LinkorFile.Name: source or dataset name, such asGenBank.Description: accession number or description of the data.Date: date associated with the data.URI: external URL when the data type isLink.- File selector: local file attachment when the data type is
File.
For a Link, enter the resource in URI. On desktop, File offers Copy to project or Link original. The latter depends on the original path remaining accessible. Check availability after transfers and investigate missing-file warnings. Use Media for image, audio, or video files rather than the non-media file selector.
Use Media for images or other media records associated with the specimen. Media records are stored in the shared media system and linked to the specimen through the specimen-media relationship.
Managing specimen records
Section titled “Managing specimen records”Open the three-dot menu on the specimen page to manage records:
Create specimen: add a new specimen record.Duplicate part: create a new specimen using the current specimen's part information. Review IDs, dates, times, and treatments before saving.Sort records: choose the field and direction used to order the specimen list. Each record viewer keeps its own sort.Export specimen: save a JSON record or an archive that includes specimen media.Import specimen: choose a new or existing target specimen, then map the imported event, site, and taxon references to records in the current project.Delete record: delete the specimen, its measurements, parts, associated data, and media links. The field number is not reused automatically.Delete all records: delete all specimens, measurements, parts, associated data, and specimen media in the current project.
Changing the event in Capture Records clears the event-dependent method, collector, and coordinate values. Capture date and time are preserved. When a record is imported, review these relationships and all generated identifiers before continuing your cataloging workflow.